Waitlist Functionality
Manage event capacity with automated waitlists. Control approvals and send confirmations for exclusive events when space becomes available.
Enabling the Waitlist
Section titled “Enabling the Waitlist”Waitlists let you control who attends your event by requiring approval before someone can RSVP. You can enable waitlists for all guests, set automatic triggers based on capacity or date, or apply them only to public registration.
All Guests
Section titled “All Guests”Enable waitlist for everyone when you want full control over attendees. This creates an “Apply to Attend” experience where all guests need your approval before they can RSVP.
-
Access RSVP Settings
Open the RSVP tool inside your event and find the RSVPs settings dropdown on the right side (it defaults to “Open”).
-
Enable Waitlist
Select “Waitlist” from the dropdown.
Now all guests will be registered with waitlist status instead of automatically accepted, regardless of whether they use an invitation link or public registration.
Capacity or Date Triggered Waitlist
Section titled “Capacity or Date Triggered Waitlist”Use automatic triggers to let pre-approved guests register normally while sending overflow registrations to the waitlist. This works well when you want to honor your guest list but manage capacity.
-
Open Registration Settings
Navigate to the RSVP page and scroll to the registration box in the right column.
-
Choose Registration Type
Select from the dropdown options:
- Open: Guests can register and RSVP normally
- Closed: No new registrations allowed
- Waitlist: New registrations go to waitlist only
-
Set Automatic Triggers
Toggle on capacity limits or closing dates to automatically switch to waitlist mode when conditions are met.
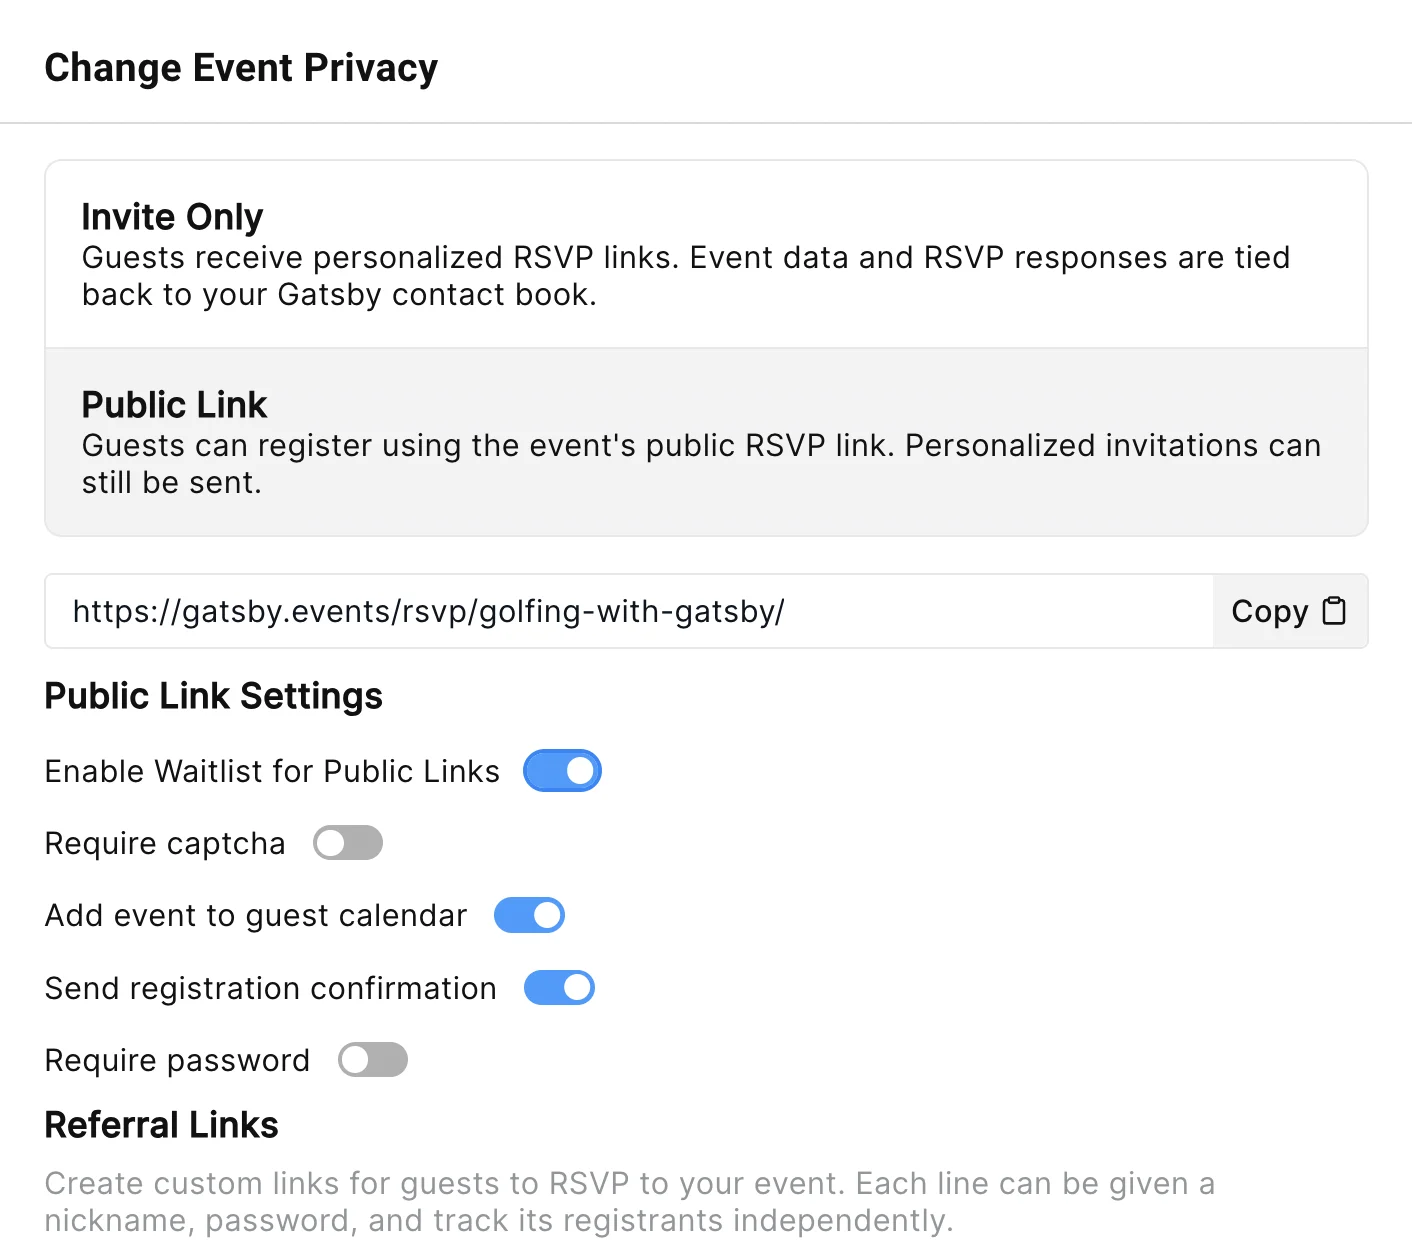
Public Events Waitlist
Section titled “Public Events Waitlist”Control public registration by requiring approval even for events with public links. This prevents open registration while still allowing people to request access.
-
Enable Public Link
Click “Invite Only” under your event title and switch to “Public Link.”
-
Activate Public Waitlist
Toggle “Enable Waitlist for Public Links” to “On.” You can also access this setting in the registration box on the RSVP page.
Managing Waitlist Approvals
Section titled “Managing Waitlist Approvals”Waitlisted guests appear in your guest list with a pink “waitlisted” tag next to their RSVP status. You can review these requests and decide who to approve.
-
Organize Your Review
Create a waitlisted tab in your guest list. Consider adding columns or sections to track approved versus denied requests.
-
Approve Guests
Change approved guests’ RSVP status to “Accepted.” A popup will ask if you want to send them a confirmation email.
-
Send Confirmation
Click “Yes” to send the standard confirmation, or send a personalized campaign with their RSVP link and calendar invite attached.
Do waitlisted guests receive an email?
Yes, you can configure the waitlist confirmation email on the RSVP page. Learn more about confirmation emails.
How do I approve waitlisted guests?
Change their status to “Accepted” in the guest list and choose whether to send them a confirmation email.
Add to your calendar
Add to your calendar