Create Multi-Event Registration
Build a multi-day conference registration system where guests register once and choose which sessions to attend. Step-by-step guide to send automatic calendar invites for selected events only.
Let guests register once and choose between events to attend.
This guide shows you how to create a multi-day conference or event series where guests select their own schedule or which events they’ll actually attend.
What You’re Building
Section titled “What You’re Building”You’ll create one main registration event that handles invitations and RSVPs. You’ll then create seperate events in Gatsby for anything that needs its own calendar invite.
Guests register once, pick between events, and automatically receive calendar invites for only the events they selected.
Why multiple events?
Each event in Gatsby sends its own calendar invite. To give guests separate calendar entries for different sessions, you need separate events. Don’t worry, the setup is faster than you think.
Before You Start
Section titled “Before You Start”You’ll need:
- Basic knowledge of creating events and landing pages
- An idea about which events can register for
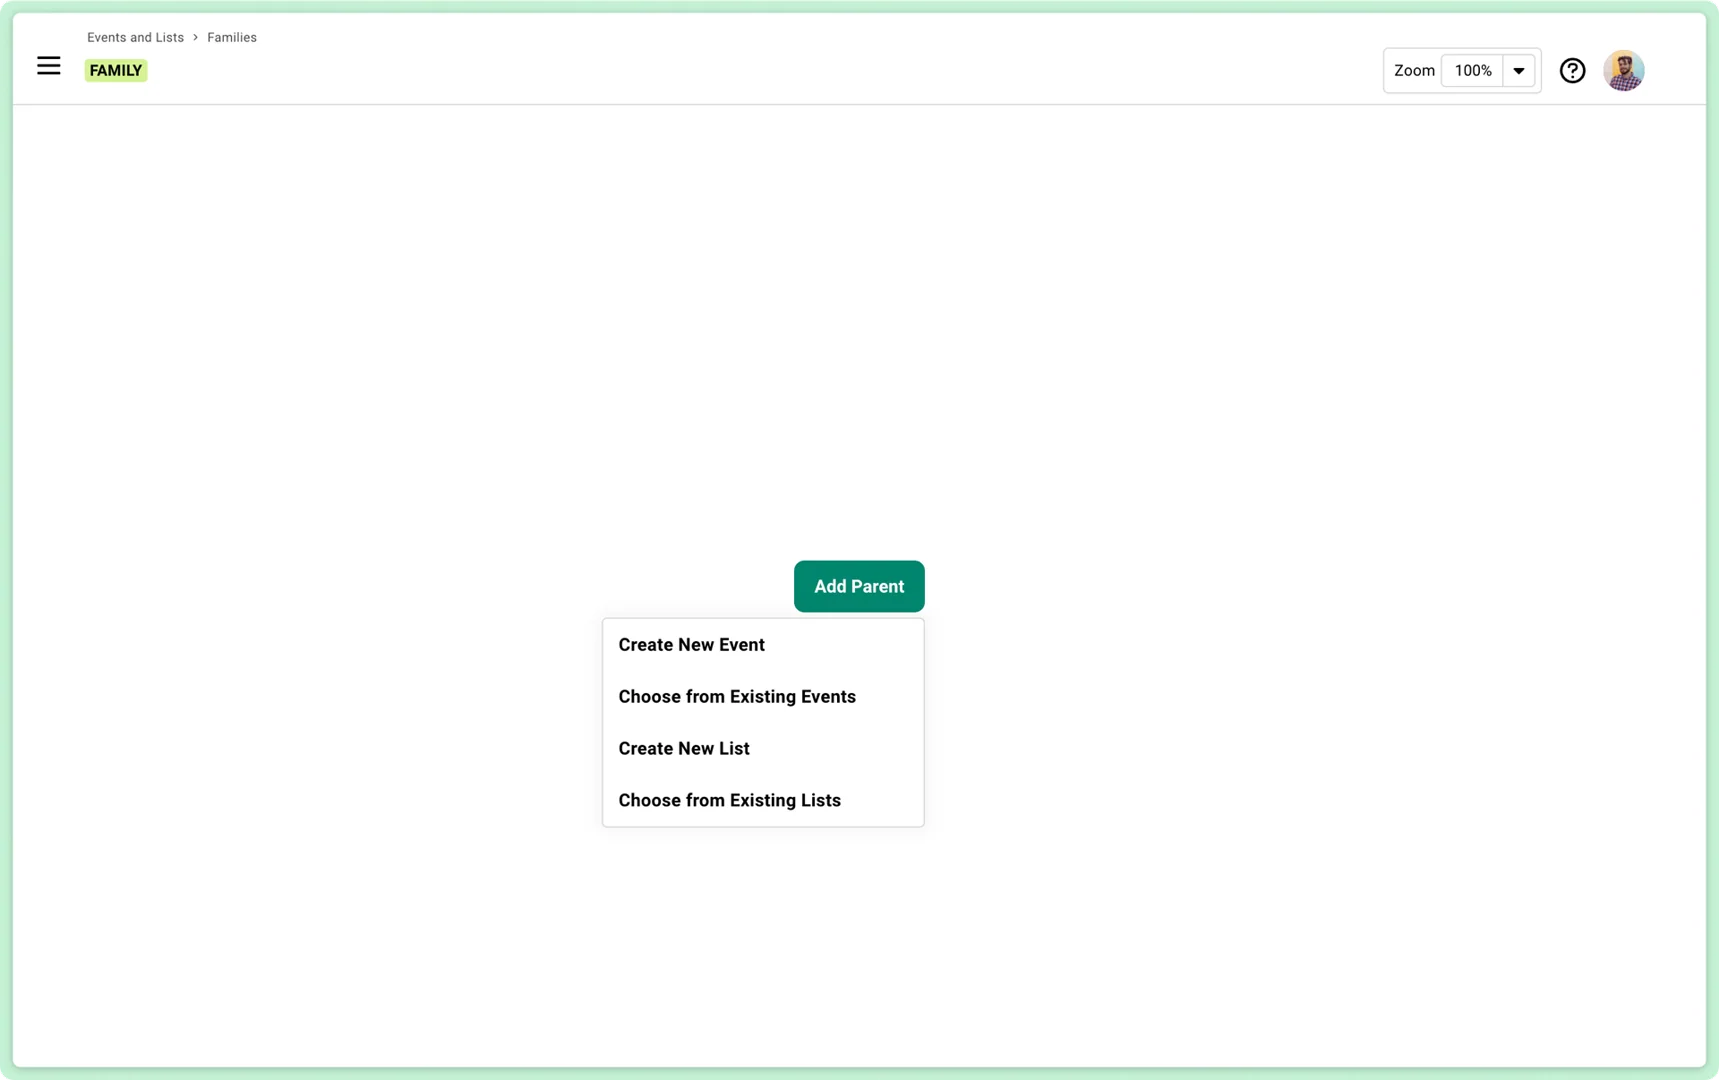
Step 1: Create Your Event Family
Section titled “Step 1: Create Your Event Family”The Families tab lets you create all your connected events at once.
-
Open Families
Go to Events and Lists > Families.
-
Create Family
Click the green Create Family button.
-
Add Parent Event
Click Add Parent > Create New Event.
-
Name Your Event
Give your event a name (like “Summit 2026”). Set an Internal Name. Use something clear like “Summit 2026 - Registration Event” so you know which event is your primary one.
-
Set Details
Guests won’t see this information, but set your general event date, time, and location to help keep track of it.
What the parent event does:
This is your main registration hub. This is where guests will see a landing page, where you send invites from, and where you can track all your guests in one place.
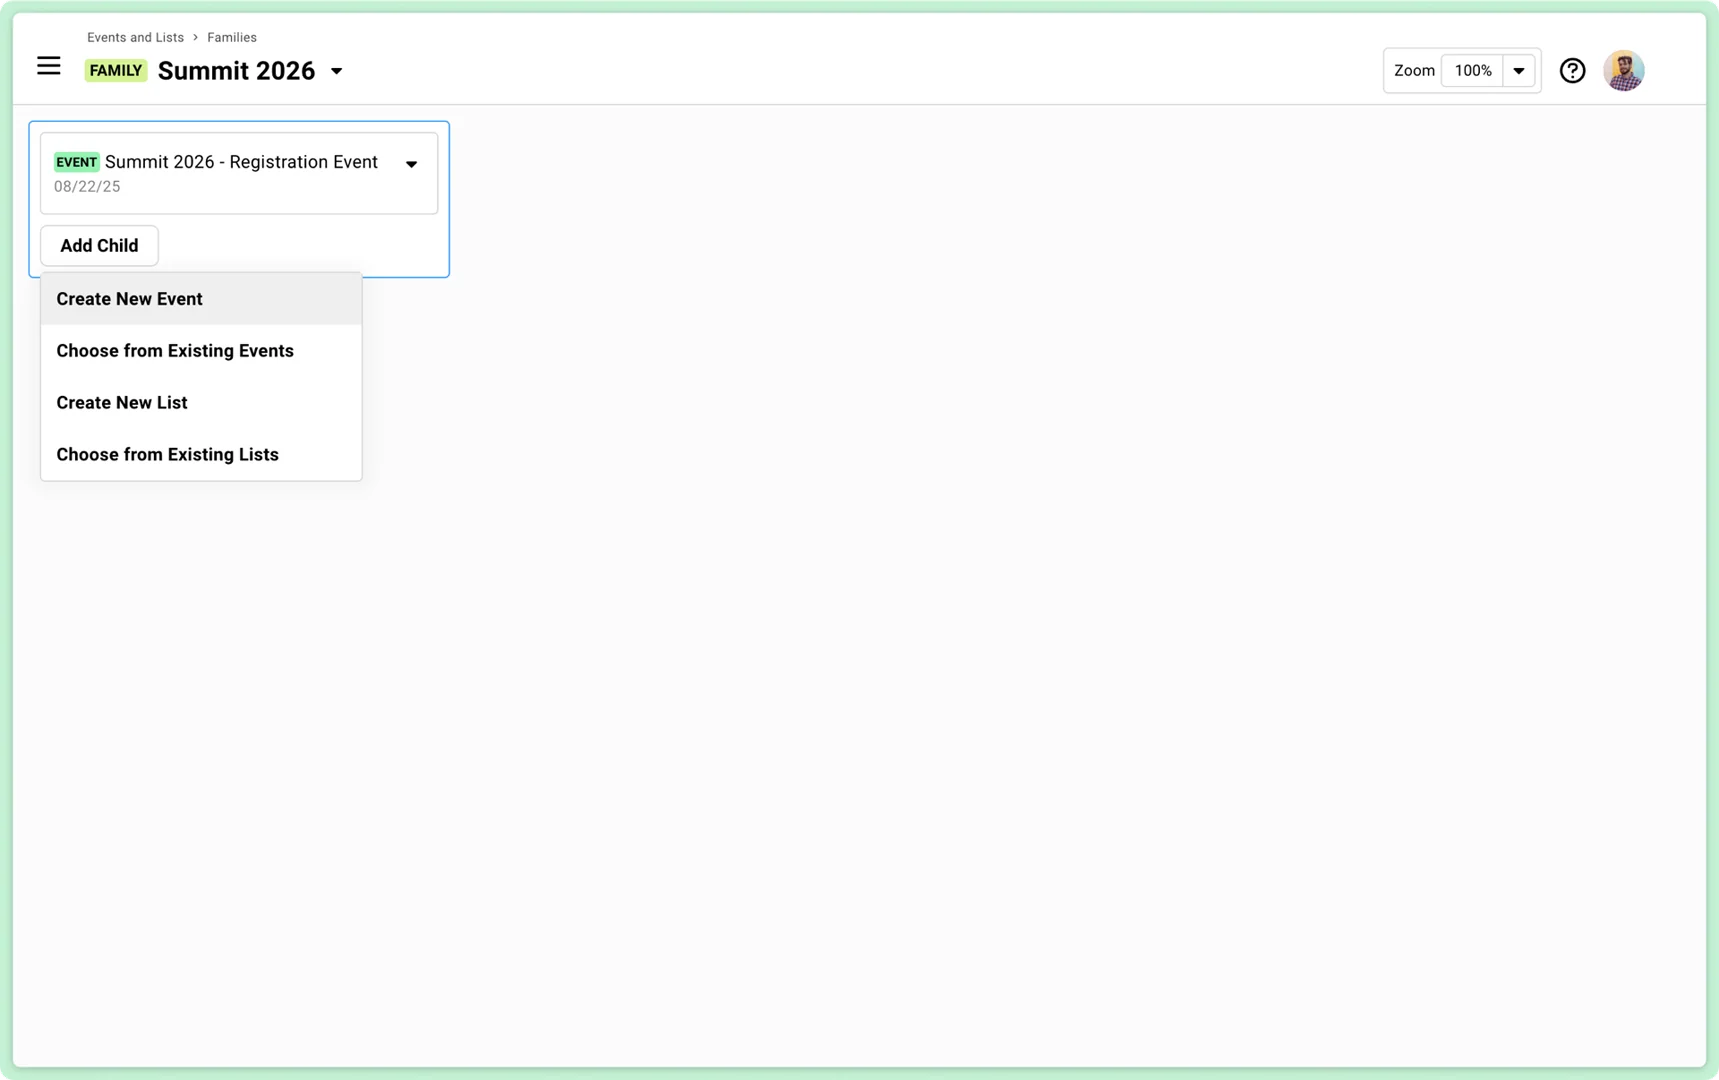
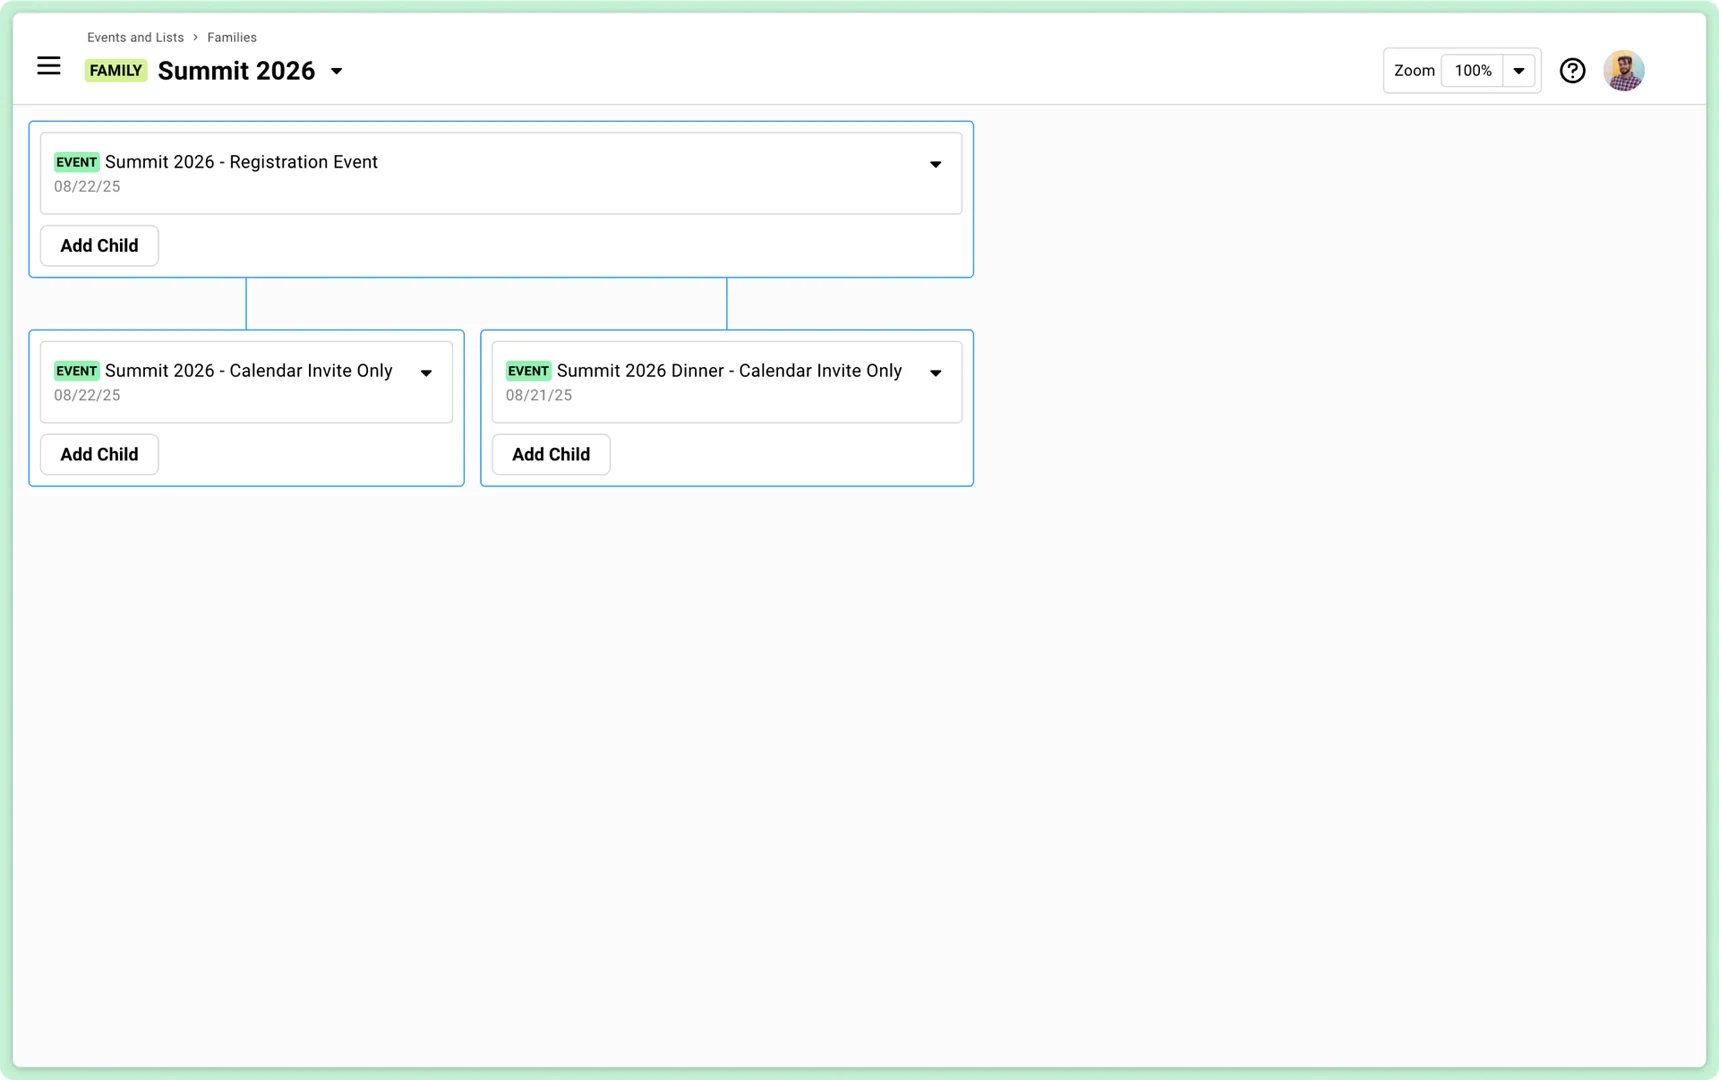
Step 2: Add Your Session Events
Section titled “Step 2: Add Your Session Events”Still in the Families view, under your parent event:
-
Add Child Event
Click Add Child > Create New Event under the first event you created.
-
Name the Event
Use your sub-event’s name (like “Reception Dinner for Summit 2026”).
-
Set Internal Name
Add something like “Calendar Invite Only” to the name: “Summit 2026 Dinner - Calendar Invite Only” to help you keep track of it (this is not guest-facing).
-
Select Template
Choose the Calendar Invite Only Event from the template dropdown. This streamlines some settings for you.
-
Enter Event Details
Set the specific date and time for this event. This date, time, and location will be sent to guests who choose to attend this particular event.
-
Create and Repeat
Click Create, then repeat for each event needing its own calendar invite.
What these child events do:
In this example, they’ll be used to only send calendar invites. That’s it. The Calendar Invite Only template removes the {rsvpLink}, so you don’t need to worry about a landing page, uploading guests, or creating campaigns. Your guests will return to your main event to edit or cancel their registration.
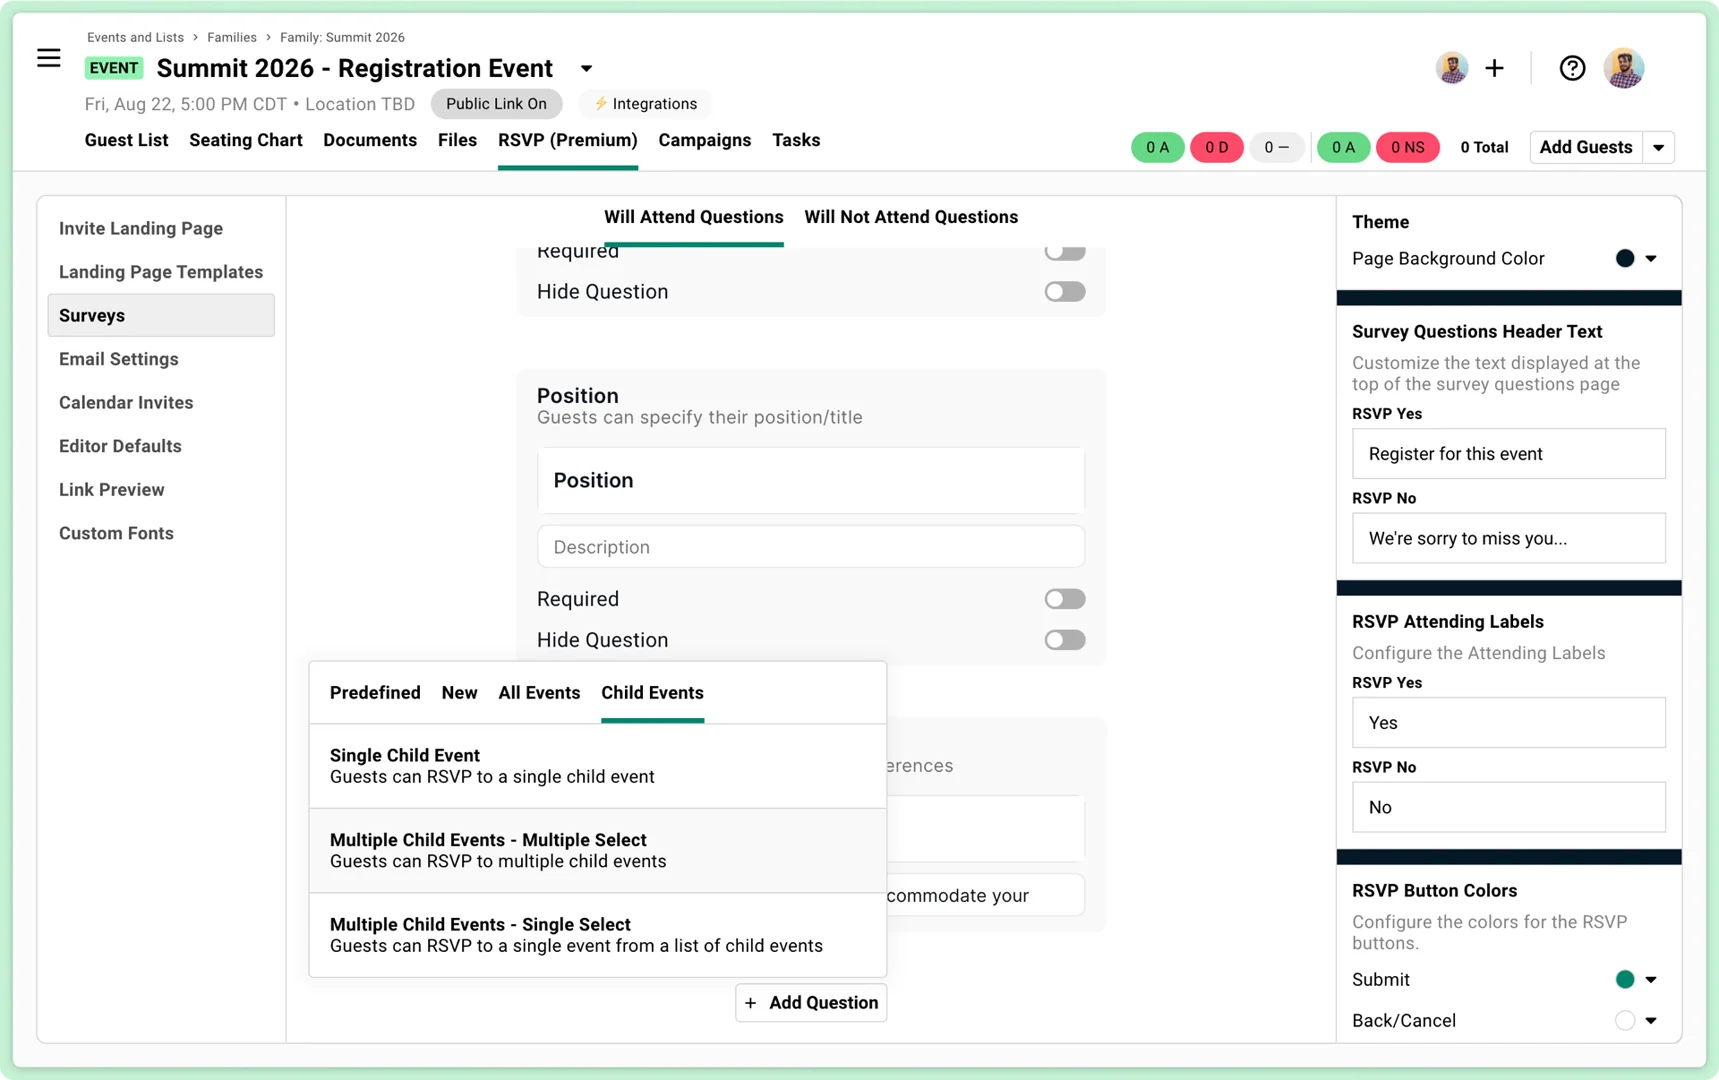
Step 3: Let Guests Choose Between Events
Section titled “Step 3: Let Guests Choose Between Events”In your parent registration event:
-
Open the Survey tool
Navigate to RSVP > Surveys.
-
Add Question
Add a new question to your survey.
-
Select Question Type
Under Event RSVP, choose Multiple Events - Multiple Select.
-
Customize Question
Change the question heading to something like “Select the events you’ll attend”.
-
Add Events
Press the “Add Other Events” button, and find the events you want your guests to choose from. In our example, we would choose the “Calendar Invite Only” events we created earlier.
-
Enable Confirmation Emails
Be sure Send confirmation email from child event is turned ON. This ensures your guests will recieve the calendar invite since it’s attached to the confirmation email.
Now when guests register, they’ll see checkboxes for each event and can pick what works for them.
Optional: VIP-Only Events
Section titled “Optional: VIP-Only Events”Need to show certain events only to specific guests?
-
Find Conditional Logic
In the same survey question, scroll to Only show question if….
-
Set Conditions
Choose conditions based on custom fields or custom columns on your guest list like “Guest Type”. This is data you create on the guest list and associate with each guest.
-
Add Condition
This allows you to show registration for certain sub-events to certain segments of your guest list.
When sending a personal RSVP link to each guest, Gatsby will pull this information in and only provide the option if the fields are a match!
Step 4: Configure Your Confirmation Emails
Section titled “Step 4: Configure Your Confirmation Emails”This is where the magic happens. Each event automatically sends its own perfectly-timed confirmation email.
For Your Registration Event (Parent)
Section titled “For Your Registration Event (Parent)”-
Open Email Settings
Go to RSVP > Email Settings.
-
Remove Calendar Invite
Click the X next to Calendar Invite Attachment.
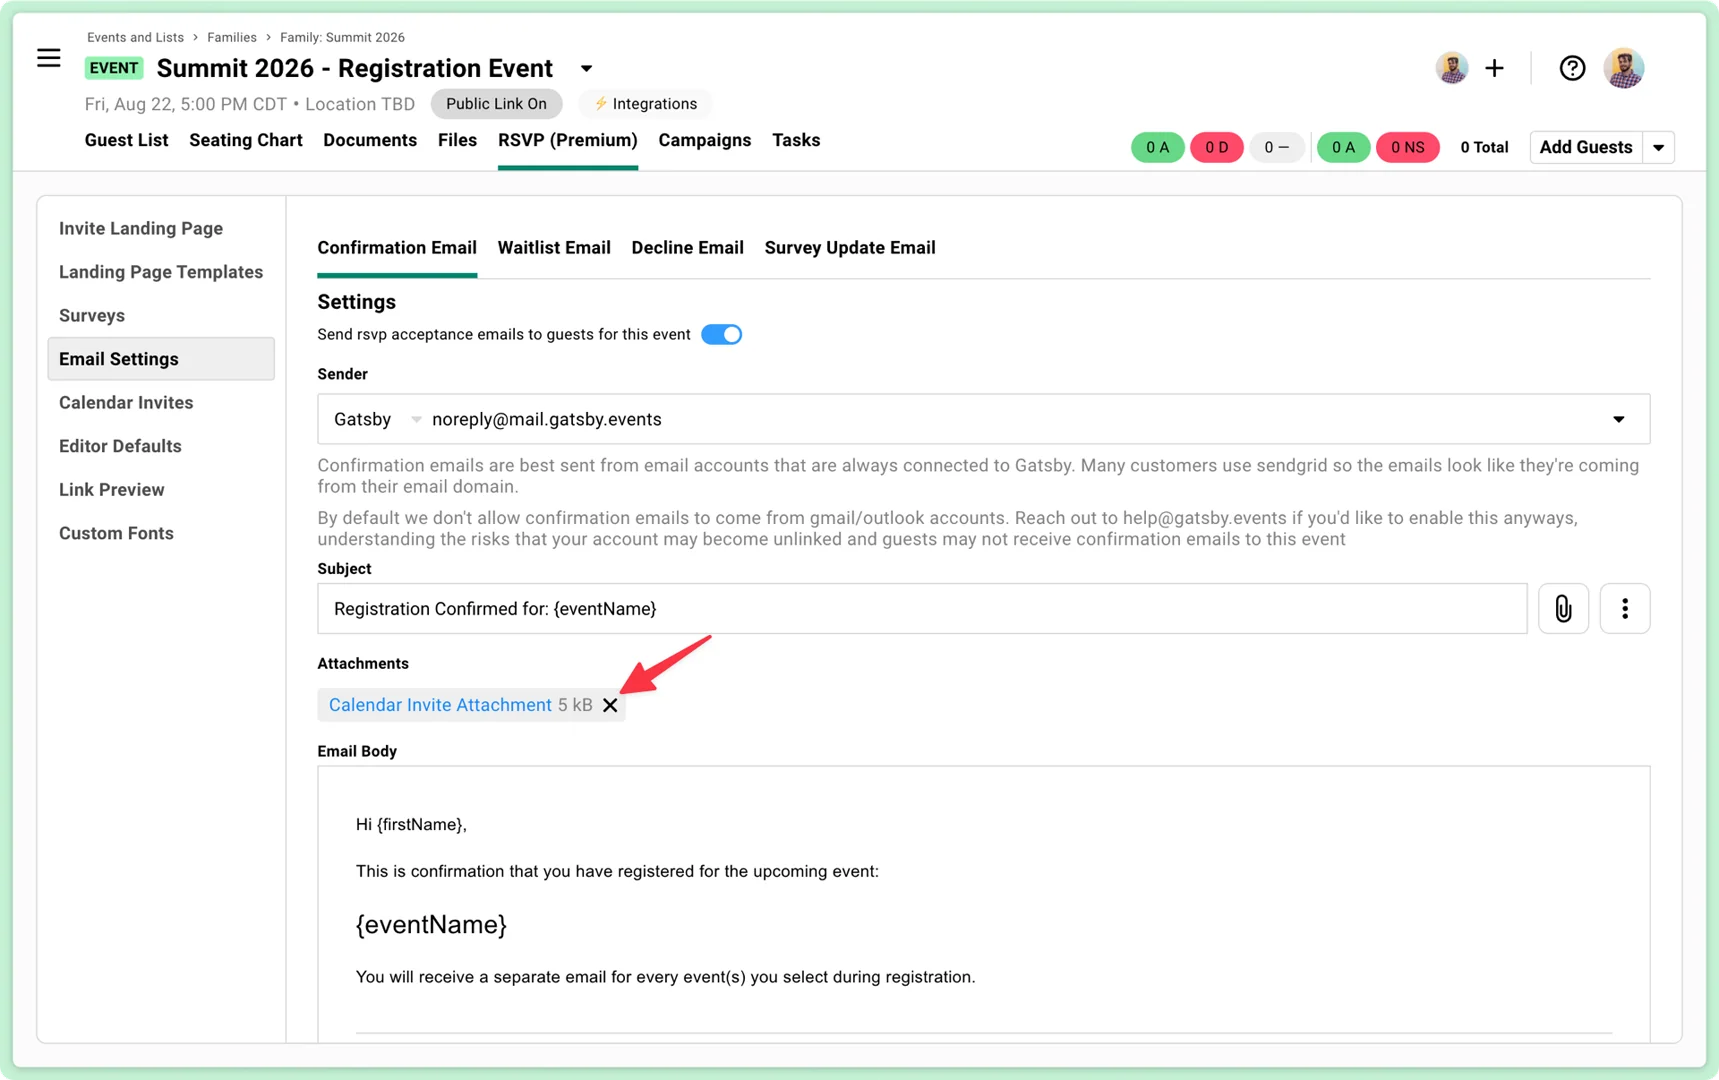
-
Keep Email Active
Recommended: leave this confirmation email enabled. Guests need their
{rsvpLink}to modify their registration later. The confirmation email from your main, registration event serves as a breadcrumb for guests to get back to your event to review details and edit their registration later. -
Add Explanation
Optional: include something like: “You will receive a separate email for every event(s) you selected during registration.”
For Each Calendar Invite Only Event (Children)
Section titled “For Each Calendar Invite Only Event (Children)”-
Open Child Event
Navigate to each child event’s confirmation email under RSVP > Email Settings.
-
Keep Calendar Attachment
It should be attached by default.
-
Remove RSVP Links
Delete any
{rsvpLink}merge tags from the email body and calender invite description field. This link would send guests to your specific sub-events. For this scenario, we want guests to modify their registration only in the main event where invites were sent. -
Add Instructions
Include something like: “To manage your RSVP (accept, decline, or update), please use your original invitation and not this calendar invite.”
Why remove the RSVP link?
You want guests managing their registration in one place: the parent event. If they need to change their event selection, they should return to the main registration, not individual sub-events.
Step 5: Handle the Revisit Experience
Section titled “Step 5: Handle the Revisit Experience”When guests return to update their registration, you don’t want confusion about which event they’re managing.
In your parent, registration event:
-
RSVP tool
Navigate to RSVP > Invite Landing Page.
-
Hide Attendance Question
Scroll down on the settings on the right. Toggle ON Hide RSVP attendance question on revisiting invite.
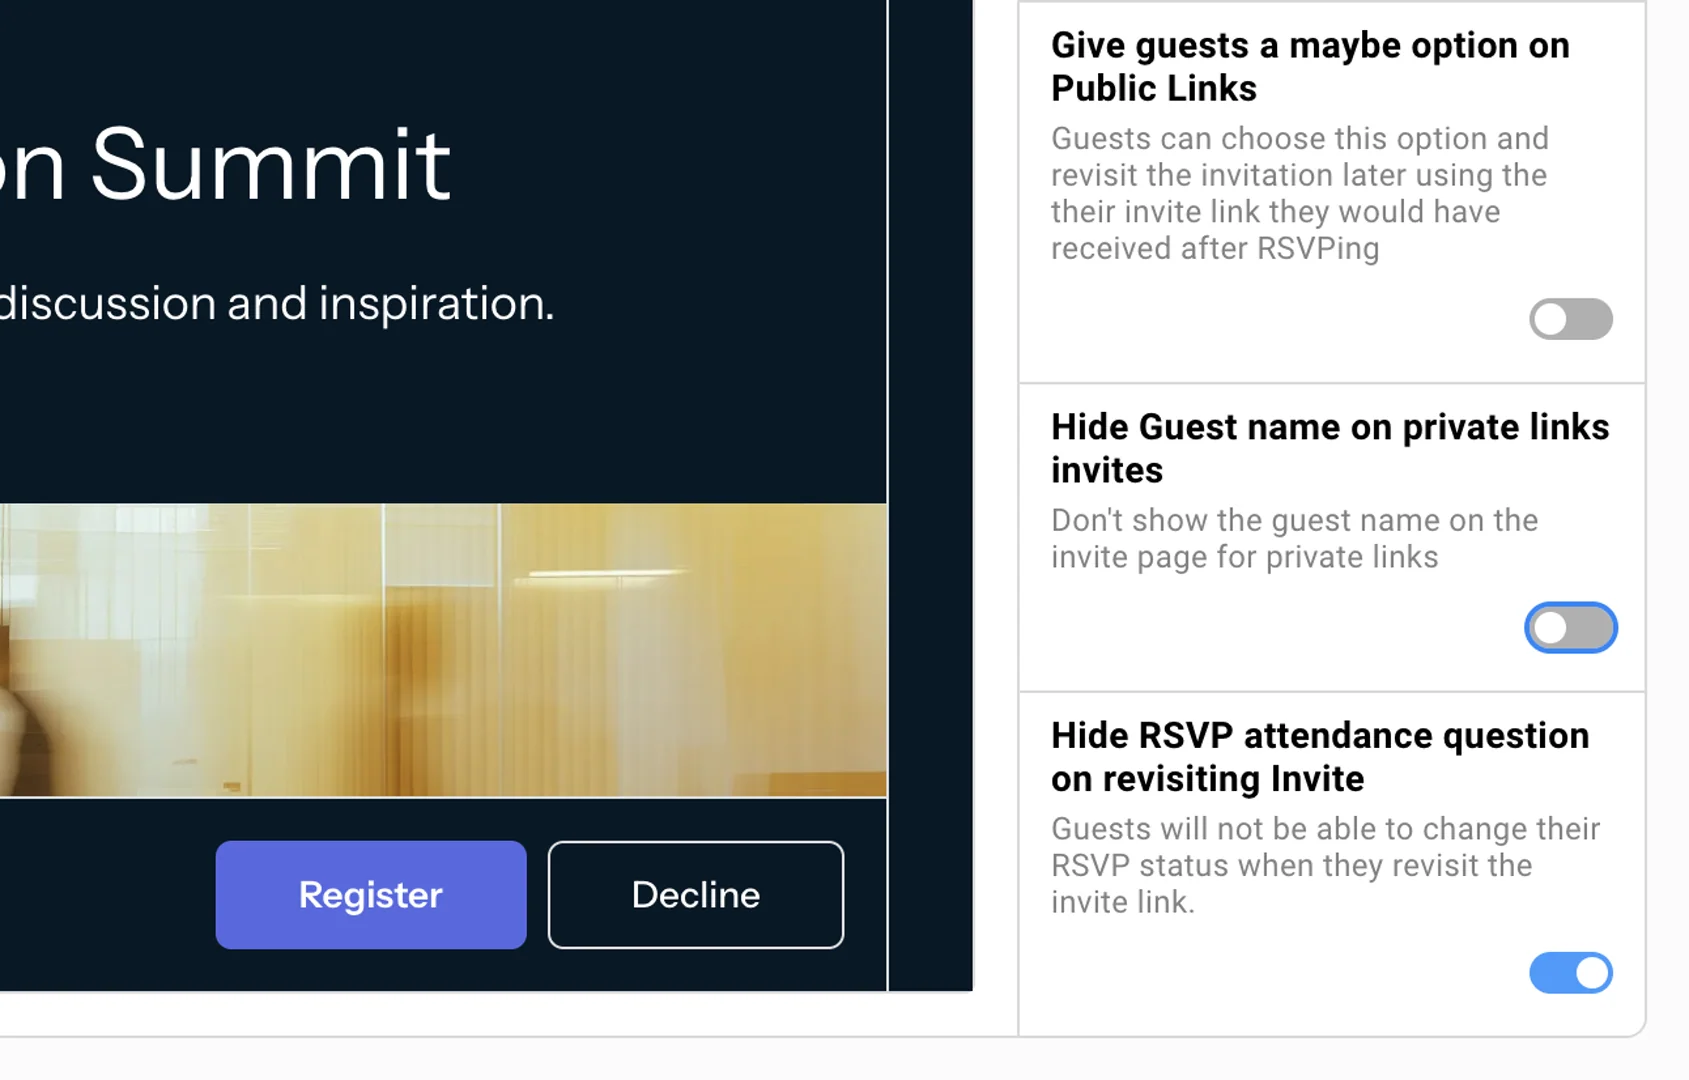
This ensures guests use the questions on your survey to manage attendance, not a yes/no question at the top that only affects the parent event.
How It Works for Guests
Section titled “How It Works for Guests”Here’s what your guests experience:
- They receive your invitation email (from the registration event)
- Click through to your branded landing page
- Click Register/Will Attend and see your survey
- Select which events they’ll attend
- Submit their registration
- Immediately receive:
- Confirmation from the main event (with no calendar invite)
- Separate confirmations with calendar invites for each selected event
If they need to change their selection, they return to the original invitation link to the parent event and update their choices there.
What About Parent-Child Syncing?
Section titled “What About Parent-Child Syncing?”Parent-child relationships in Gatsby do one main thing: sync guests upward. When someone’s added to a child event, they automatically appear in every connected parent. That’s it. No other automation happens.
This means:
- You see all attendees in your parent event’s guest list
- You can track who’s attending which sessions using the Child Guestlist column
- Guests maintain separate RSVP statuses in each child event
Learn more about event families
Common Questions
Section titled “Common Questions”Can I send calendar invites from just the parent event?
No. Gatsby sends one calendar invite per event. Multiple calendar invites need multiple events.
Do I need landing pages for child events?
Nope. Child events using the Calendar Invite Only template don’t need landing pages since guests never visit them directly. Of course, you can change that and combine the tools in Gatsby in ways that serve your needs.
Will this create duplicate guests?
Guests appear once in your parent event, even if they’re attending multiple child events. The Child Guestlist column shows which events they’ve been added to.
Add to your calendar
Add to your calendar